フォーム
HTML のフォームを扱うことは多くの Web アプリケーションで行うことですが、考慮することが多く扱いが難しい部分の1つです。 Symfony2 の Form コンポーネントを活用すると、フォームを簡単に扱うことができるようになります。 本章では、複雑なフォームを1から作成を行う過程を通じて、フォームライブラリの重要な機能について学びます。
Note
Symfony の Form コンポーネントは単独で利用できるように設計されています。 コンポーネントについて詳しく知りたい方は、Github の Symfony2 Form Component を見てください。
シンプルなフォームの作成
フォームを解説するために、商品を表示する簡単なストアアプリケーションを作成していきましょう。 このアプリケーションには、ユーザーが商品の作成や編集を行うためのフォームを作成する必要があります。 フォームを作成するに当たって、まずは商品情報を表す Product クラスを作成します。
// src/Acme/StoreBundle/Entity/Product.php
namespace Acme\StoreBundle\Entity;

class Product
{
    public $name;

    protected $price;

    public function getPrice()
    {
        return $this->price;
    }

    public function setPrice($price)
    {
        $this->price = $price;
    }
}
Note
サンプルコードを入力しながら進めていく場合は、``AcmeStoreBundle`` というバンドルを作成して、そこにファイルを作成するようにしましょう。 次のコマンドを実行するとバンドルが作成されます。
php app/console generate:bundle --namespace=Acme/StoreBundle
このようなクラスは Symfony などのライブラリを必要としないため、一般的に「プレーンオールド PHP オブジェクト」と呼ばれます。 ストアアプリケーションにおける商品などのように、*あなたが作ろうとしている* アプリケーションに実装しなければならない本質的な問題を解決するための、とてもシンプルな PHP オブジェクトです。 本章の最後までに、フォームを通じて送信されたデータを Product オブジェクトに反映し、検証を行い、データベースに保存することまで行います。
ここまでで、アプリケーションの実装の中心となるシンプルな PHP クラスを作成しましたが、フォームに関連する作業は何も行っていません。 本章における最終的な目標は、ユーザーがフォームを通じて Product オブジェクトをインタラクティブに操作できるようになることです。
フォームを組み立てる
Product クラスを作成したので、次は実際にフォームをレンダリングを行います。 Symfony2 では、フォームオブジェクトを組み立て、それをテンプレート内でレンダリングします。 まずはこれらの処理をコントローラに記述していきます。
// src/Acme/StoreBundle/Controller/DefaultController.php
namespace Acme\StoreBundle\Controller;

use Symfony\Bundle\FrameworkBundle\Controller\Controller;
use Acme\StoreBundle\Entity\Product;
use Symfony\Component\HttpFoundation\Request;

class DefaultController extends Controller
{
    public function indexAction(Request $request)
    {
        // Productオブジェクトを作成し、ダミーデータを設定する
        $product = new Product();
        $product->name = 'Test product';
        $product->setPrice('50.00');

        $form = $this->createFormBuilder($product)
            ->add('name', 'text')
            ->add('price', 'money', array('currency' => 'USD'))
            ->getForm();

        return $this->render('AcmeStoreBundle:Default:index.html.twig', array(
            'form' => $form->createView(),
        ));
    }
}
Tip
今回のサンプルではコントローラの内部で直接フォームを組み立てています。 この後、「:ref:`book-form-creating-form-classes`」節で、この組み立て処理を単独のクラスとして定義するようにします。 再利用性のため、クラスとして定義する方法をおすすめします。
Symfony2では「フォームビルダー」を用いてフォームオブジェクトの組み立てるため、とても簡単にフォームが作成できます。 フォームビルダーはフォームの組み立てを簡単に行うために用意されたオブジェクトです。
今回のサンプルでは、フォームには2つのフィールドを定義します。 定義するフィールドは name と price の2つで、これらはそれぞれ Product クラスの name と price プロパティに対応します。 name フィールドは text というタイプが指定されており、このフィールドがテキストフィールドとして扱われることを意味します。 price フィールドには money タイプが指定されており、これはローカライズされた金額が表示される特別なテキストフィールドとなります。 Symfony2 には様々なタイプが組み込まれており、リファレンスページ(用意されているフィールドタイプ)にそれぞれの説明が記載してあります。
フォームオブジェクトが作成できたので、次はこれをレンダリングします。 レンダリングのために用意されたフォーム「ビュー」オブジェクトをテンプレートに渡し(前述のコントローラの $form->createView() の部分)、フォーム用のヘルパー関数にセットすることで行います。
-
Twig
{# src/Acme/StoreBundle/Resources/views/Default/index.html.twig #}

<form action="{{ path('store_product') }}" method="post" {{ form_enctype(form) }}>
    {{ form_widget(form) }}

    <input type="submit" />
</form>
-
PHP
<!-- src/Acme/StoreBundle/Resources/views/Default/index.html.php -->

<form action="<?php echo $view['router']->generate('store_product') ?>" method="post" <?php echo $view['form']->enctype($form) ?> >
    <?php echo $view['form']->widget($form) ?>

    <input type="submit" />
</form>
Note
この例では AcmeStoreBundle:Default:index コントローラに store_product というルーティングでアクセスできるように設定してあるものとしています。
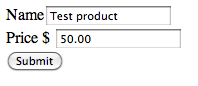
これでレンダリングができました。 form_widget(form) によってそれぞれのフィールド、ラベルのレンダリングが行われ、フォームに関するエラーメッセージもレンダリングされるようになりました。 実際に開発を行う際は、フォームの配置を整えるため、フィールドごとにレンダリングを行いたいでしょう。 それについては「 フォームのレンダリング 」を参考にしてください。
次に進む前に、レンダリングされた name テキストフィールドの値に $product の name プロパティに設定した値(ここでは “Test product”)が設定されていることに注目してください。 このように、オブジェクトに設定されたデータをフィールドに合わせて変換し、HTMLのフォームに適切に反映することが、フォームが行う1つめの仕事です。
Tip
フォームの仕組みはとてもよくできており、 Product の price プロパティのようにprotectedで定義されたプロパティの場合、``getPrice()`` や setPrice() メソッドを通じてプロパティにアクセスを行います。 プロパティがpublicでない場合、フォームがプロパティにアクセスできるよう 必ず ゲッターとセッターメソッドを定義しておかなければなりません。 Boolean型のプロパティの場合、ゲッターの代わりに「is」ではじまるメソッド(たとえば getPublished() の代わりに isPublished())を用いても構いません。
フォームに送信されたデータを処理する
フォームの2つめの仕事は、ユーザーから送信されたデータをオブジェクトのプロパティに設定することです。 それを行うために、ユーザーから送信されたデータをフォームに結びつける(バインドする)必要があります。 コントローラに次のコードを記述してください。
use Symfony\Component\HttpFoundation\Request;
// ...

public function indexAction(Request $request)
{
    // 新規に $product オブジェクトを作成(ダミーデータは入れない)
    $product = new Product();

    $form = $this->createFormBuilder($product)
        ->add('name', 'text')
        ->add('price', 'money', array('currency' => 'USD'))
        ->getForm();

    if ($request->getMethod() == 'POST') {
        $form->bindRequest($request);

        if ($form->isValid()) {
            // データベースへの保存など、何らかのアクションを実行する

            return $this->redirect($this->generateUrl('store_product_success'));
        }
    }

    // ...
}
これで、フォームから送信が行われたときに、コントローラが送信されたデータをフォームにバインドし、それらのデータが $product オブジェクトの name や price といったプロパティに設定されます。 この一連の処理は bindRequest() メソッドを通じて行われます。
Note
bindRequest() が呼び出された時点で、送信されたデータはフォームの内部に持つオブジェクトに反映されます。 その際、データの妥当性に問わず、オブジェクトに反映されます。
今回実装したコントローラでは、フォームを操作する際に用いる一般的なパターンに乗っ取り、次の3つのことを行います。
- 最初にページがロードされる時は、``GET`` リクエストメソッドによってアクセスされ、コントローラはフォームの生成とレンダリングのみを行います(バインドは行いません)。
- ユーザーが``POST`` メソッドを用いてフォームの送信を行った時、その中に妥当でない値を含んでいる場合(妥当性の検証(バリデーション)は次節で説明します)、バインドされたデータをレンダリングする際に、バリデーションエラーメッセージを含んだ状態でレンダリングが行われます。
- ユーザーが妥当なデータを送信した時、データベースへの保存など $product に対する何らかのアクションを行い、登録完了画面などへリダイレクトします。
Note
ユーザーがフォームを送信して何か操作を行った後にリダイレクトを行うことは、ユーザーがページを再読込みしてフォームが再送信されることを防ぐ意味を持っています。
フォームバリデーション
前節で、フォームから送信されたデータに対するバリデーションについて触れました。 Symfony2では、バリデーションはフォームが保持しているオブジェクト(今回は Product)に対して行われます。 つまり、フォームから送信された値が妥当かどうかではなく、その値が反映された $product オブジェクトが妥当かどうかを判定します。 $form->isValid() は $product オブジェクトが妥当かどうかを判定するショートカットとなります。
バリデーションを行うためには、クラスに対してルールのセット(これを「制約」と呼んでいます)を設定します。 それでは、``name`` フィールドには空以外の値を、``price`` フィールドには空以外で、かつ0以上の数のみを受け付けるよう、制約を設定します。
-
YAML
# Acme/StoreBundle/Resources/config/validation.yml
Acme\StoreBundle\Entity\Product:
    properties:
        name:
            - NotBlank: ~
        price:
            - NotBlank: ~
            - Min: 0
-
XML
<!-- Acme/StoreBundle/Resources/config/validation.xml -->
<class name="Acme\StoreBundle\Entity\Product">
    <property name="name">
        <constraint name="NotBlank" />
    </property>
    <property name="price">
        <constraint name="Min">
            <value>0</value>
        </constraint>
    </property>
</class>
-
Annotations
// Acme/StoreBundle/Entity/Product.php
use Symfony\Component\Validator\Constraints as Assert;

class Product
{
    /**
     * @Assert\NotBlank()
     */
    public $name;

    /**
     * @Assert\NotBlank()
     * @Assert\Min(0)
     */
    protected $price;
}
-
PHP
// Acme/StoreBundle/Entity/Product.php
use Symfony\Component\Validator\Mapping\ClassMetadata;
use Symfony\Component\Validator\Constraints\NotBlank;
use Symfony\Component\Validator\Constraints\Min;

class Product
{
    // ...

    public static function loadValidatorMetadata(ClassMetadata $metadata)
    {
        $metadata->addPropertyConstraint('name', new NotBlank());

        $metadata->addPropertyConstraint('price', new NotBlank());
        $metadata->addPropertyConstraint('price', new Min(0));
    }
}
これでバリデーションが行われるようになります。 フォームに妥当ではない値を入力して送信すると、対応するエラーメッセージが表示されるでしょう。
Note
フォームが生成するHTMLのコードには、HTML5に新しく定義されたフィールドや、ブラウザ側で入力チェックを行う「required」属性が用いられています。 Firefox 4、Chrome 3.0、Opera 9.5などのモダンブラウザを使うと動作が確認できるでしょう。
バリデーションはSymfony2が提供するとても強力な機能で、:doc:独立した章</book/validation> が設けられています。
バリデーショングループ
:ref:`バリデーショングループ <book-validation-validation-groups>`を活用したい場合、フォームにバリデーショングループを指定する必要があります:
$form = $this->createFormBuilder($users, array(
        'validation_groups' => array('registration')
    )
    // ...
;
フォームクラス を作成しているのであれば、次のように getDefaultOptions() メソッドを定義します:
public function getDefaultOptions(array $options) {
    return array(
        'validation_groups' => array('registration')
    );
}
どちらのケースも、オブジェクトに対して registration バリデーショングループ のみが 用いられます。
用意されているフィールドタイプ
Symfonyでは一般的なフォームで用いるフィールドタイプを網羅しています。
フィールドグループ
Base フィールド
もちろん、自分でカスタムしたフィールドタイプを作成することもできます。 このやり方については、クックブックの「 カスタムフォームフィールドタイプの作成方法 」を見てください。
一般的なフィールドタイプのオプション
price フィールドに、連想配列でオプションが設定されていたことにはお気づきでしょうか。
->add('price', 'money', array('currency' => 'USD'))
それぞれのフィールドタイプにはそれに応じたオプションが用意されています。 それぞれのタイプごとのドキュメントページをみると、タイプごとのオプションが確認できるでしょう。 同じ内容を意味するオプションなど、複数のタイプで同じオプションが使えるものもあります。
required
type: Boolean default: true
If true, an HTML5 required attribute will be rendered. The corresponding label will also render with a required class.
This is superficial and independent from validation. At best, if you let Symfony guess your field type, then the value of this option will be guessed from your validation information.
max_length
type: integer
This option is used to add a max_length attribute, which is used by some browsers to limit the amount of text in a field.
フィールドタイプの推測
Product クラスにはバリデーション用のメタデータが設定されているため、Symfonyはそこに含まれる情報からフィールドに関する情報をいくらか得ることができます。 そして、Symfonyはそれを元にフィールドタイプを「推測」し、フィールドのセットアップを行うことができます。 先ほど設定したバリデーション制約の場合、``name`` と price フィールドは どちらも text フィールドと推測されます。 name フィールドについてはその推測が正しいので、コードを次のように変更し、Symfonyの推測機能を用いるようにします。
public function indexAction()
{
    $product = new Product();

    $form = $this->createFormBuilder($product)
        ->add('name')
        ->add('price', 'money', array('currency' => 'USD'))
        ->getForm();
}
バリデーション制約を元にフィールドタイプが推測されることにより、 name フィールドから text タイプという記述を取り除くことができました。 しかし、``price`` フィールドは、Symfonyが推測するタイプ(text)よりも詳細な情報を持つ money タイプを設定しているため、指定はそのままにしています。
Note
createFormBuilder() メソッドには次の2つの引数を指定できます。
- フォームフィールドを初期化するためのデフォルトデータ。 連想配列か、今回のようなプレーンオールドPHPオブジェクトを受け取ります。
- フォームに渡すオプション配列
この例はあまり実用的ではありませんが、フィールドタイプの推測によって記述量は大きく減らせるでしょう。 後ほど解説しますが、推測はDoctrineのメタデータからも行えます。
Caution
バリデーション制約を元にした推測では、バリデーショングループは考慮されません。 推測されたものが正しくない場合、その値を上書きして設定することで対応します。
フォームのレンダリング
ここまでの部分で、1行でフォーム全体をレンダリングする方法については説明しました。 もちろん、より柔軟にレンダリングすることもできます。
-
Twig
{# src/Acme/StoreBundle/Resources/views/Default/index.html.twig #}

<form action="{{ path('store_product') }}" method="post" {{ form_enctype(form) }}>
    {{ form_errors(form) }}

    {{ form_row(form.name) }}
    {{ form_row(form.price) }}

    {{ form_rest(form) }}

    <input type="submit" />
</form>
-
PHP
<!-- // src/Acme/StoreBundle/Resources/views/Default/index.html.php -->

<form action="<?php echo $view['router']->generate('store_product') ?>" method="post" <?php echo $view['form']->enctype($form) ?>>
    <?php echo $view['form']->errors($form) ?>

    <?php echo $view['form']->row($form['name']) ?>
    <?php echo $view['form']->row($form['price']) ?>

    <?php echo $view['form']->rest($form) ?>

    <input type="submit" />
</form>
それぞれ部分的にみていきます。
- form_enctype(form) - 1つでもファイルアップロード用のフィールドが設定されている場合、 enctype="multipart/form-data" をレンダリングします。
- form_errors(form) - 複数のフィールドにまたがるものなど、フォーム全体に関わるエラー(グローバルエラー)をレンダリングします。
- form_row(form.price) - 渡されたフィールド(ここでは price)に対するラベル、エラー、HTMLのフォームウィジェットをレンダリングします。
- form_rest(form) - レンダリングされていないすべてのフィールドをレンダリングします。 hiddenフィールドのレンダリングし忘れなどを防止するために、このヘルパーをフォームの下部に配置します。 このヘルパーは CSRF 対策 としても利用されます。
ラベルやエラー、HTMLフォームウィジェットのレンダリングなど、大部分の処理は form_row ヘルパーによって行われます。 なお、デフォルトではフォームウィジェットは div タグで囲まれた状態でレンダリングされます。 フォームテーマ 節にて、``form_row`` の出力をカスタマイズする方法を解説しています。
Tip
HTML5では、ブラウザ側でフォームのバリデーションを行う仕組みが用意されています。 Symfonyを用いて生成したフォームはその仕組みを最大限活用するようになっています。 もしこの仕組みを無効にしたい場合、``form`` タグに novalidate 属性を指定するか、サブミットボタンに formnovalidate 属性を指定します。
それぞれのフィールドを手動でレンダリングする
form_row ヘルパーは、フィールドを手っ取り早くレンダリングするのにうってつけです(「行(row)」のマークアップはカスタマイズも可能です)。 複雑なフォームの場合はフィールドを好きなように配置することも可能です。
-
Twig
{{ form_errors(form) }}

<div>
    {{ form_label(form.name) }}
    {{ form_errors(form.name) }}
    {{ form_widget(form.name) }}
</div>

<div>
    {{ form_label(form.price) }}
    {{ form_errors(form.price) }}
    {{ form_widget(form.price) }}
</div>

{{ form_rest(form) }}
-
PHP
<?php echo $view['form']->errors($form) ?>

<div>
    <?php echo $view['form']->label($form['name']) ?>
    <?php echo $view['form']->errors($form['name']) ?>
    <?php echo $view['form']->widget($form['name']) ?>
</div>

<div>
    <?php echo $view['form']->label($form['price']) ?>
    <?php echo $view['form']->errors($form['price']) ?>
    <?php echo $view['form']->widget($form['price']) ?>
</div>

<?php echo $view['form']->rest($form) ?>
もし自動生成されるラベルを変更したい場合は、次のようにして明示的に指定します。
-
Twig
{{ form_label(form.name, 'Product name') }}
-
PHP
<?php echo $view['form']->label($form['name'], 'Product name') ?>
これらに加え、フィールドタイプごとにレンダリングオプションが用意されています。 それぞれのオプションはドキュメントに記載してありますが、中でもよく使われるのがフォームの属性を指定するための attr オプションです。 次の例ではフィールドに name_field class属性を指定します。
-
Twig
{{ form_widget(form.name, { 'attr': {'class': 'name_field'} }) }}
-
PHP
<?php echo $view['form']->widget($form['name'], array(
    'attr' => array('class' => 'name_field'),
)) ?>
Twigテンプレート 関数リファレンス
Twigを利用している場合、フォームに関する関数のリファレンスはすべて リファレンスマニュアル に記載されています。
フォームクラスの作成
フォームがコントローラ内で直接組み立てができることは既に解説しました。 しかしながら、フォームの組み立て処理をクラスとして独立させることで、再利用性の向上につながります。 次は商品フォームを組み立てる処理をクラス化したものです。
// src/Acme/StoreBundle/Form/Type/ProductType.php

namespace Acme\StoreBundle\Form\Type;

use Symfony\Component\Form\AbstractType;
use Symfony\Component\Form\FormBuilder;

class ProductType extends AbstractType
{
    public function buildForm(FormBuilder $builder, array $options)
    {
        $builder->add('name');
        $builder->add('price', 'money', array('currency' => 'USD'));
    }

    public function getName()
    {
        return 'product';
    }
}
このクラスには商品フォームを作成するための処理がすべて記述されています(getName() メソッドはタイプを識別するユニークな値を返す必要があります)。 あとはコントローラでこれを呼び出すだけで素早くフォームが組み立てられます。
// src/Acme/StoreBundle/Controller/DefaultController.php

// クラスの先頭にuseステートメントを追加
use Acme\StoreBundle\Form\Type\ProductType;

public function indexAction()
{
    $product = // ...
    $form = $this->createForm(new ProductType(), $product);

    // ...
}
Note
フォームのデータは setData() メソッドを通じてセットすることもできます。
$form = $this->createForm(new ProductType());
$form->setData($product);
setData メソッドを使う場合、フィールドタイプの推測機能を利用するには次のようにフォームクラスを指定する必要があります。
public function getDefaultOptions(array $options)
{
    return array(
        'data_class' => 'Acme\StoreBundle\Entity\Product',
    );
}
このようにするのは、 フォームが作成された時点でフォームタイプの推測が行われ、オブジェクトが渡されるのはそれより後になるためです。
フォームに関する処理をクラスとしてまとめることで、容易に再利用できるようになります。 これがもっともよいやり方ですが、最終的にどうやるかはあなた次第です。
フォームと Doctrine
フォームを目的はオブジェクト(Product など)のデータを HTML のフォームに変換することと、フォームから送信されたデータを元のオブジェクトに反映することです。 ここでは Product オブジェクトをデータベースに保存するやり方について解説しますが、フォームとは直接関係のない内容になります。 Product クラスを Doctrine を用いて保存できるように設定しているのであれば、次のようにして送信されたデータが妥当な場合に保存を行います。
if ($form->isValid()) {
    $em = $this->get('doctrine')->getEntityManager();
    $em->persist($product);
    $em->flush();

    return $this->redirect($this->generateUrl('store_product_success'));
}
もし何らかの理由により、もともとデータが格納されていた $product オブジェクトにアクセスしたくない場合、次のようにしてフォームから取得できます。
$product = $form->getData();
より詳しい情報は、 Doctrine ORM の章 を参照してください。
重要なことは、フォームにデータがバインドされたとき、そのデータは内部に持つオブジェクトへ直ちに反映されるということです。 つまりそのデータを保存したいのであれば、単純にそのオブジェクトを保存すればよいわけです。
もしフォームの内部に持つオブジェクト(Product など)がDoctrine ORMによってマッピングされている場合、フォームフレームワークはバリデーションのメタデータと同様に、その情報をもとにタイプの推測を行います。
フォームの埋め込み
1つのフォームで複数のオブジェクトを使いたいことがしばしばあると思います。 例えば、``User`` オブジェクトを登録するフォームで Address などの様々なオブジェクトも扱わなければならない場合などです。 フォームコンポーネントを用いると、簡単かつ自然にこれらの処理が行えます。
単一のオブジェクトの埋め込み
Product には Category オブジェクトが紐づいているとします。
// src/Acme/StoreBundle/Entity/Category.php
namespace Acme\StoreBundle\Entity;

use Symfony\Component\Validator\Constraints as Assert;

class Category
{
    /**
     * @Assert\NotBlank()
     */
    public $name;
}
Product クラスは $category プロパティを持ち、そこに Category が紐づきます。
use Symfony\Component\Validator\Constraints as Assert;

class Product
{
    // ...

    /**
     * @Assert\Type(type="Acme\StoreBundle\Entity\Category")
     */
    protected $category;

    // ...

    public function getCategory()
    {
        return $this->category;
    }

    public function setCategory(Category $category)
    {
        $this->category = $category;
    }
}
これらをアプリケーションへ反映したら、 Category オブジェクトをユーザーが修正できるようにフォームクラスを作成します。
// src/Acme/StoreBundle/Form/Type/CategoryType.php
namespace Acme\StoreBundle\Form\Type;

use Symfony\Component\Form\AbstractType;
use Symfony\Component\Form\FormBuilder;

class CategoryType extends AbstractType
{
    public function buildForm(FormBuilder $builder, array $options)
    {
        $builder->add('name');
    }

    public function getDefaultOptions(array $options)
    {
        return array(
            'data_class' => 'Acme\StoreBundle\Entity\Category',
        );
    }

    public function getName()
    {
        return 'category';
    }
}
name フィールドのフィールドタイプは Category クラスのバリデーションメタデータをもとに(text と)推測されます。
ここでの最終目標は Product がもつ Category を Product のフォームから変更できるようにすることです。 それをするために ProductType に category プロパティを追加し、そこに CategoryType オブジェクトを設定します。
public function buildForm(FormBuilder $builder, array $options)
{
    // ...

    $builder->add('category', new CategoryType());
}
これで CategoryType は ProductType と共にレンダリングできるようになりました。 Category フィールドのレンダリングは Product のフィールドをレンダリングするのと同じように行えます。
-
Twig
{# ... #}
{{ form_row(form.price) }}

<h3>Category</h3>
<div class="category">
    {{ form_row(form.category.name) }}
</div>

{{ form_rest(form) }}
{# ... #}
-
PHP
<!-- ... -->
<?php echo $view['form']->row($form['price']) ?>

<h3>Category</h3>
<div class="category">
    <?php echo $view['form']->row($form['category']['name']) ?>
</div>

<?php echo $view['form']->rest($form) ?>
<!-- ... -->
フォームからデータが送信されると、``Category`` のフィールドに対応するデータが Category オブジェクトに反映されます。 これらはすべて、メインの Product オブジェクトを操作する一環として行われます。 Category オブジェクトは $product->getCategory() のように取得でき、データベースへ保存など、任意に操作できます。
複数フォームの埋め込み
collection フィールドタイプを使うと、1つのフォームの中に複数フォームを埋め込むこともできます。 たとえば、``reviews`` プロパティと、そこに対応する ProductReviewType タイプがあるとして、``ProductType`` を次のように変更します。
public function buildForm(FormBuilder $builder, array $options)
{
    // ...

    $builder->add('reviews', 'collection', array(
       'type' => new ProductReviewType(),
    ));
}
フォームのテーマ
Every part of how a form renders can be customized. You’re free to change how each form “row” renders, change the markup used to render errors, or even customize how a textarea tag should be rendered. Nothing is off-limits, and different customizations can be used in different places.
Symfony uses templates to render each and every part of a form, such as field label tags, input tags, error messages and everything else.
In Twig, each form “fragment” is represented by a Twig block. To customize any part of how a form renders, you just need to override the appropriate block.
In PHP, each form “fragment” is rendered via an individual template file. To customize any part of how a form renders, you just need to override the existing template by creating a new one.
To understand how this works, let’s customize the form_row fragment and add a class attribute to the div element that surrounds each row. To do this, create a new template file that will store the new markup:
-
Twig
{# src/Acme/StoreBundle/Resources/views/Form/fields.html.twig #}

{% block field_row %}
{% spaceless %}
    <div class="form_row">
        {{ form_label(form) }}
        {{ form_errors(form) }}
        {{ form_widget(form) }}
    </div>
{% endspaceless %}
{% endblock field_row %}
-
PHP
<!-- src/Acme/StoreBundle/Resources/views/Form/field_row.html.php -->

<div class="form_row">
    <?php echo $view['form']->label($form, $label) ?>
    <?php echo $view['form']->errors($form) ?>
    <?php echo $view['form']->widget($form, $parameters) ?>
</div>
The field_row form fragment is used when rendering most fields via the form_row function. To tell the component to use your new field_row fragment defined above, add the following to the top of the template that renders the form:
-
Twig
{# src/Acme/StoreBundle/Resources/views/Default/index.html.twig #} {% form_theme form 'AcmeStoreBundle:Form:fields.html.twig' %} <form ...> -
PHP
<!-- src/Acme/StoreBundle/Resources/views/Default/index.html.php -->

<?php $view['form']->setTheme($form, array('AcmeStoreBundle:Form')) ?>

<form ...>
The form_theme tag (in Twig) “imports” the fragments defined in the given template and uses them when rendering the form. In other words, when form_row is called later in this template, it will use the field_row block from your custom theme.
To customize any portion of a form, you just need to override the appropriate fragment. Knowing exactly which block or file to override is the subject of the next section.
In the following section, you’ll learn more about how to customize different portions of a form. For a more extensive discussion, see フォームのレンダリングのカスタマイズ方法.
Form Template Blocks
In Symfony, every part a form that is rendered - HTML form elements, errors, labels, etc - is defined in a base theme, which is a collection of blocks in Twig and a collection of template files in PHP.
In Twig, every block needed is defined in the form_div_layout.html.twig file that lives inside the Twig Bridge. Inside this file, you can see every block needed to render a form and every default field type.
In PHP, the fragments are individual template files. By default they are located in the Resources/views/Form directory of the framework bundle (view on GitHub).
Each fragment name follows the same basic pattern and is broken up into two pieces, separated by a single underscore character (_). A few examples are:
- field_row - used by form_row to render most fields;
- textarea_widget - used by form_widget to render a textarea field type;
- field_errors - used by form_errors to render errors for a field;
Each fragment follows the same basic pattern: type_part. The type portion corresponds to the field type being rendered (e.g. textarea or checkbox) whereas the part portion corresponds to what is being rendered (e.g. label, widget). By default, there are exactly 7 possible parts of a form that can be rendered:
| label | (e.g. field_label) | renders the field’s label |
| widget | (e.g. field_widget) | renders the field’s HTML representation |
| errors | (e.g. field_errors) | renders the field’s errors |
| row | (e.g. field_row) | renders the field’s entire row (label+widget+errors) |
| rows | (e.g. field_rows) | renders the child rows of a form |
| rest | (e.g. field_rest) | renders the unrendered fields of a form |
| enctype | (e.g. field_enctype) | renders the enctype attribute of a form |
By knowing the field type (e.g. textarea) and which part you want to customize (e.g. widget), you can construct the fragment name that needs to be overridden (e.g. textarea_widget).
Form Type Block Inheritance
In some cases, the fragment you want to customize will appear to be missing. For example, there is no textarea_errors fragment in the default themes provided with Symfony. So how are the errors for a textarea field rendered?
The answer is: via the field_errors fragment. When Symfony renders the errors for a textarea type, it looks first for a textarea_errors fragment before falling back to the field_errors fragment. Each field type has a parent type (the parent type of textarea is field), and Symfony uses the fragment for the parent type if the base fragment doesn’t exist.
So, to override the errors for only textarea fields, copy the field_errors fragment, rename it to textarea_errors and customize it. To override the default error rendering for all fields, copy and customize the field_errors fragment directly.
Global Form Theming
In addition to theming individual templates, you can also tell Symfony to import form customizations across your entire project.
Twig
When using Twig, you’ve seen how you can use the form_theme Twig tag in a template to import form customizations that will be used inside that template. You can also tell Symfony to automatically use certain form customizations for all templates in your application. To automatically include the customized blocks from the fields.html.twig template created earlier, modify your application configuration file:
-
YAML
# app/config/config.yml

twig:
    form:
        resources:
            - 'AcmeStoreBundle:Form:fields.html.twig'
    # ...
-
XML
<!-- app/config/config.xml --> <twig:config ...> <twig:form> <resource>AcmeStoreBundle:Form:fields.html.twig</resource> </twig:form> <!-- ... --> </twig:config> -
PHP
// app/config/config.php

$container->loadFromExtension('twig', array(
    'form' => array('resources' => array(
        'AcmeStoreBundle:Form:fields.html.twig',
     ))
    // ...
));
Any blocks inside the fields.html.twig template are now used globally to define form output.
PHP
When using PHP, you’ve seen how you can use the setTheme helper method in a template to import form customizations that will be used inside that template. You can also tell Symfony to automatically use certain form customizations for all templates in your application. To automatically include the customized templates from the Acme/StoreBundle/Resources/views/Form directory created earlier, modify your application configuration file:
-
YAML
# app/config/config.yml

framework:
    templating:
        form:
            resources:
                - 'AcmeStoreBundle:Form'
# ...
-
XML
<!-- app/config/config.xml --> <framework:config ...> <framework:templating> <framework:form> <resource>AcmeStoreBundle:Form</resource> </framework:form> </framework:templating> <!-- ... --> </framework:config> -
PHP
// app/config/config.php

$container->loadFromExtension('framework', array(
    'templating' => array('form' =>
        array('resources' => array(
            'AcmeStoreBundle:Form',
     )))
    // ...
));
Any fragments inside the Acme/StoreBundle/Resources/views/Form directory are now used globally to define form output.
CSRF Protection
CSRF - or Cross-site request forgery - is a method by which a malicious user attempts to make your legitimate users unknowingly submit data that they don’t intend to submit. Fortunately, CSRF attacks can be prevented by using a CSRF token inside your forms.
The good news is that, by default, Symfony embeds and validates CSRF tokens automatically for you. This means that you can take advantage of the CSRF protection without doing anything. In fact, every form in this chapter has taken advantage of the CSRF protection!
CSRF protection works by adding a field to your form - called _token by default - that contains a value that only you and your user knows. This ensures that the user - not some other entity - is submitting the given data. Symfony automatically validates the presence and accuracy of this token.
The _token field is a hidden field and will be automatically rendered if you include the form_rest() function in your template, which ensures that all un-rendered fields are output.
The CSRF token can be customized on a form-by-form basis. For example:
class ProductType extends AbstractType
{
    public function getDefaultOptions(array $options)
    {
        return array(
            'data_class'      => 'Acme\StoreBundle\Entity\Product',
            'csrf_protection' => true,
            'csrf_field_name' => '_token',
            'intention'  => 'product_creation',
        );
    }

    public function getName()
    {
        return 'product';
    }
}
To disable CSRF protection, set the csrf_protection option to false. Customizations can also be made globally in your project. For more information, see the form configuration reference section.
Note
The intention option is optional but greatly enhances the security of the generated token by making it different for each form.
Final Thoughts
You now know all of the building blocks necessary to build complex and functional forms for your application. When building forms, keep in mind that the first goal of a form is to translate data from an object (Product) to an HTML form so that the user can modify that data. The second goal of a form is to take the data submitted by the user and to re-apply it to the object.
There’s still much more to learn about the powerful world of forms, such as how to handle file uploads with Doctrine or how to create a form where a dynamic number of sub-forms can be added (e.g. a todo list where you can keep adding more fields via Javascript before submitting). See the cookbook for these topics.